#1 2008-02-03 03:35:24
[Oleg/LLY] WL-500g 系列改機基本步驟
寫在前面:本站所有改機流程皆有其風險,所有風險請玩家自行負責,本站僅提供資訊交流平台。
有鑑於很多朋友是改機新手,常常在一開始就忽略了最基本的步驟,直接進到本板一些進階文章,會有銜接不上的感覺,所以就有個想法把基本步驟也在此補齊,我相信此舉對一些新手會有一些幫助。
在此僅將步驟寫下,不多做說明,若需要詳細說明者,請參考 ASUS WL系列改機網路資源
進入主題,改機最重要的步驟就是更換成非官方版的韌體。這裡討論皆以 Oleg's firmware 為主,所以請至 http://oleg.wl500g.info/ 下載最新版韌體,目前最新版韌體是 1.9.2.7-10,早期機種如 WL-500g、WL-HDD 只更新到 1.9.2.7-9,請注意。
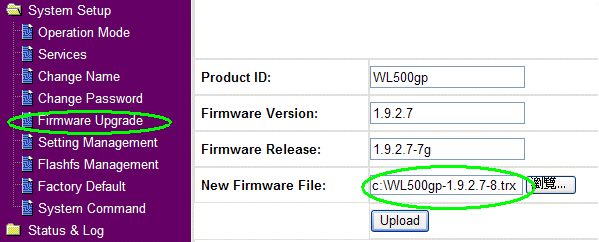
接下來點選 firmware upgrade,將剛剛下載下來的韌體解開 upload 上去,上載完成待系統重新啟動後,即完成升級。
------------------------我是分隔線--------------------------
重新啟動後請先進入系統設定頁面,將 USB Application 裡的所有的服務關閉,包括 FTP Server、Samba 分享、NFS 及 Webcam 等服務關閉(參考下圖)。
關閉內建 FTP 功能
關閉內建 Samba 功能
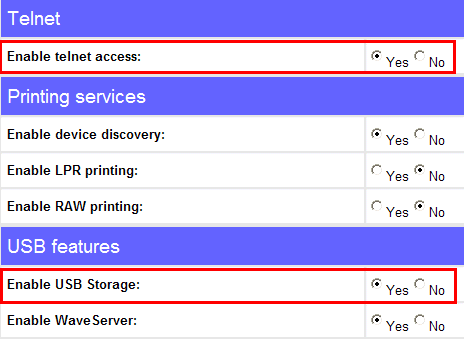
到 System Setup->Service 裡將 Enable telnet access 及 Enable USB Storage 設成 enable (參考下圖)
設定完成,系統會要求重新啟動。
重新啟動後,接下來你已經可以透過 telnet 方式連進來
執行 fdisk -l 先確認有哪些磁碟
例如:
$ fdisk -l
Disk /dev/scsi/host0/bus0/target0/lun0/disc: 132 MB, 132120576 bytes
5 heads, 51 sectors/track, 1011 cylinders
Units = cylinders of 255 * 512 = 130560 bytes

                                 Device Boot    Start       End    Blocks   Id  System
表示目前有 /dev/scsi/host0/bus0/target0/lun0/disc 容量 132MB
接下來分割磁碟,就如同安裝 Windows 一般,安裝前必須先做磁碟分割,在 Linux 基本上一定需要劃分兩個磁碟,一為主要磁碟:存放系統程式及相關設定等資料。二為 swap 磁區:主要作為主記憶體的延伸的交換磁碟,swap 至少保留 64MB 的空間。
$ fdisk /dev/scsi/host0/bus0/target0/lun0/disc
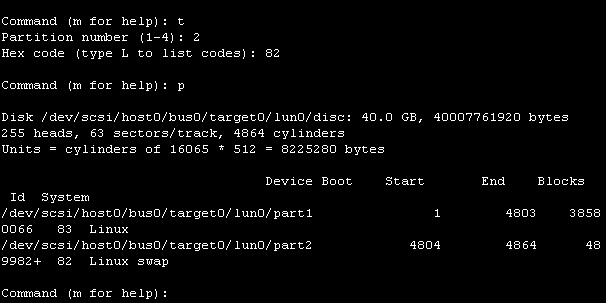
在 fdisk 裡分割完 part2 後,選 "t" 功能,將 part2 的 system id 變更為 82。
做完磁碟分割記得按 "w" 寫入設定。
注意磁碟路徑,可能會有所不同。
格式化檔案系統 swap 及 ext3
$ mkswap /dev/scsi/host0/bus0/target0/lun0/part2
$ swapon /dev/scsi/host0/bus0/target0/lun0/part2
$ mke2fs -j /dev/scsi/host0/bus0/target0/lun0/part1
$ mount /dev/scsi/host0/bus0/target0/lun0/part1 /opt
確認一下系統磁碟狀態,是否正確掛載
$ df
$ free
安裝 ipkg 套件管理系統
$ mkdir -p /opt/tmp/ipkg
$ ipkg.sh update
$ ipkg.sh install ipkg-opt
安裝 nano 文字編輯器
$ ipkg install nano
建立系統啟動檔
$ mkdir -p /usr/local/sbin
$ touch /usr/local/sbin/post-boot
$ touch /usr/local/sbin/post-firewall
$ chmod +x /usr/local/sbin/*
$ mkdir -p /usr/local/etc/dropbear
建立一組 dss 及 rss 的 host key,須花一點時間,請耐心等候..
$ dropbearkey -t dss -f /usr/local/etc/dropbear/dropbear_dss_host_key
$ dropbearkey -t rsa -f /usr/local/etc/dropbear/dropbear_rsa_host_key
編輯 /usr/local/sbin/post-boot
$ nano /usr/local/sbin/post-boot
內容是:
#!/bin/sh
sleep 2

# Activate swap
swapon /dev/scsi/host0/bus0/target0/lun0/part2

# wait for /opt to mount
mount /dev/scsi/host0/bus0/target0/lun0/part1 /opt
i=0
while [ $i -le 30 ]
do
if [ -d /opt/etc ]
then
break
fi
sleep 1
i=`expr $i + 1`
done

# Run all active services - active means starts with S
/opt/etc/init.d/rc.unslung

# Start SSH daemon
dropbear
將檔案寫入 flash 記憶體
$ flashfs save
$ flashfs commit
$ flashfs enable
接下來設定 SAMBA 2,首先建立路徑 /opt/etc/samba
$ mkdir -p /opt/etc/samba
編輯 SAMBA 設定檔
$ nano /opt/etc/samba/smb.conf
內容:
[global]
workgroup = Workgroup
guest account = admin
security = share
browseable = yes
guest ok = yes
guest only = no
log level = 1
max log size = 100
encrypt passwords = yes
dns proxy = no

[Share]
path=/opt/share
writeable = yes
browseable = yes
建立路徑 /opt/etc/init.d
$ mkdir -p /opt/etc/init.d
編輯 SAMBA 2 啟動檔
$ nano /opt/etc/init.d/S97samba
內容:
#!/bin/sh
/usr/sbin/smbd -D -l /opt/var/log/smbd.log -s /opt/etc/samba/smb.conf
/usr/sbin/nmbd -D -n WL500g -o -l /tmp -s /opt/etc/samba/smb.conf
上述是以WL500g為網路芳鄰看到的主機名稱,可自行修改
改變 S97samba 檔案屬性為可執行檔
$ chmod +x /opt/etc/init.d/S97samba
接下來編輯批次啟動檔 /opt/etc/init.d/rc.unslung
$ nano /opt/etc/init.d/rc.unslung
內容:
#!/bin/sh

# Start all init scripts in /opt/etc/init.d
# executing them in numerical order.
#
for i in /opt/etc/init.d/S??* ;do

     # Ignore dangling symlinks (if any).
     [ ! -f "$i" ] && continue

     case "$i" in
        *.sh)
            # Source shell script for speed.
            (
                trap - INT QUIT TSTP
                set start
                . $i
            )
            ;;
        *)
            # No sh extension, so fork subprocess.
            $i start
            ;;
    esac
done
別忘了改變檔案屬性為可執行檔
$ chmod +x /opt/etc/init.d/rc.unslung
最後重新啟動,確認設定是否正確
$ reboot
------------------------我是分隔線--------------------------
重新啟動後,打開網路芳鄰,你就可以看到 WL500g 網路主機,點進去可以看到 Share 網路磁碟。
做完以上算是完成基本改機步驟,接下來即可到其他進階功能繼續您的改機之旅,在此祝您旅途愉快 
注意:
1.以上流程因韌體版本不同,改機流程會有所差異,我會儘可能修正流程去適用最新韌體版本
2.以上有標示$符號者,皆為命令列下操作之指令,操作時直接輸入後方指令即可,不需要鍵入 $
參考資料:
Abin's Tech Note: WL-500g HACK(中文)
Sprayfly - Asus WL-HDD Setup Guide
macsat.com - OpenWrt | Olegs Firmware
最後修改: Aven (2009-10-13 23:01:03)
技術問題請於論壇上集眾人之力公開討論,感恩

離線
#2 2008-03-05 03:40:14
Re: [Oleg/LLY] WL-500g 系列改機基本步驟
非常感谢Aven编写的教材,我看后学习到了很多
也使我加入了GP500的改机行列
不过堂主的教材有一点点小小的错误,我修正下
另外在把大陆地区不能安装ipkg的问题修正一下
首先:
請至 http://oleg.wl500g.info/ 下載最新版韌體。
下載完成,請進到系統設定畫面(參考下圖),點選firmware upgrade,將下載下來的firmware解開upload上去,上載完成待系統重新啟動後,即完成升級。
------------------------我是分隔線--------------------------
重新啟動後,這時你已經可以透過telnet方式連進來
接下來請關閉stupid-ftpd,卸載你的USB DISK
$ killall stupid-ftpd
$ umount /tmp/harddisk
執行 fdisk -l 先確認有哪些磁碟
例如:
$ fdisk -l
Disk /dev/scsi/host1/bus0/target0/lun0/disc: 132 MB, 132120576 bytes
5 heads, 51 sectors/track, 1011 cylinders
Units = cylinders of 255 * 512 = 130560 bytes

                                 Device Boot    Start       End    Blocks   Id  System
表示目前有 /dev/scsi/host1/bus0/target0/lun0/disc 容量 132MB
接下來分割磁碟,就如同安裝Windows一般,安裝前必須先做磁碟分割,在linux基本上一定需要劃分兩個磁碟,一為主要磁碟:存放系統程式及相關設定等資料。二為swap磁區:主要作為主記憶體的延伸的交換磁碟,swap至少保留64MB的空間。
注意:有的磁碟 显示的是 /dev/scsi/host0/bus0/target0/lun0/disc
用命令进行分区
$ fdisk /dev/scsi/host1/bus0/target0/lun0/disc
-------------分区介绍------------
fdisk:命令参数
m 帮助.
p 显示现有分区.
d 删除分区.
n 建立新分区.
-------------分区推荐-----------
part1 数据分区 data
part2 交换分区 swap
命令提示:
数据分区 data: n -> p -> 1 -> '回车' -> '硬盘空间的90%容量 数字格式 +数字M'
交换分区 swap: n -> p -> 2 -> '回车' -> ' 硬盘剩余空间 例如+512M' -> t-> 2 -> 82
用 fdisk -l 命令查询 后应该看到下面文字
[admin@DISK 20G root]$ fdisk -l

Disk /dev/scsi/host0/bus0/target0/lun0/disc: 20.0 GB, 20020396032 bytes
64 heads, 32 sectors/track, 19092 cylinders
Units = cylinders of 2048 * 512 = 1048576 bytes

                                 Device Boot    Start       End    Blocks   Id  System
/dev/scsi/host0/bus0/target0/lun0/part1               1       16301    16692208   83  Linux
/dev/scsi/host0/bus0/target0/lun0/part2           16302       19092     2857984   82  Linux swap
[admin@DISK 20G root]$
----------------------------------
做完磁碟分割記得按 w 寫入設定。
格式化檔案系統 ext3 及 swap
$ mke2fs -j /dev/scsi/host0/bus0/target0/lun0/part1
$ mkswap /dev/scsi/host0/bus0/target0/lun0/part2
最後重新啟動,確認磁碟分割成功
$ reboot
------------------------我是分隔線--------------------------
重開機後,mount 上磁碟,確認分割磁碟是否成功
$ mount /dev/scsi/host0/bus0/target0/lun0/part1 /opt
$ swapon /dev/scsi/host0/bus0/target0/lun0/part2
安裝 ipkg 套件管理系統
mkdir /opt/tmp
mkdir /opt/tmp/ipkg
cd /opt/tmp/ipkg
安装IPKG
wget http://ipkg.nslu2-linux.org/feeds/optware/oleg/cross/stable/ipkg-opt_0.99.163-9_mipsel.ipk
ipkg.sh install ipkg-opt_0.99.163-9_mipsel.ipk
wget http://ipkg.nslu2-linux.org/feeds/optware/oleg/cross/stable/uclibc-opt_0.9.28-13_mipsel.ipk
ipkg.sh install uclibc-opt_0.9.28-13_mipsel.ipk
ipkg update
察看安装IPKG列表
ipkg list_installed
应该显示
[admin@**** ipkg]$ ipkg list_installed
ipkg-opt - 0.99.163-9 - The Itsy Package Manager
uclibc-opt - 0.9.28-12 - micro C library for embedded Linux systems
Successfully terminated.
[admin@**** ipkg]$
注意不安装 nano 文字編輯器
改用自带的VI 编辑
建立系統啟動檔
$ mkdir /usr/local
$ mkdir /usr/local/sbin
$ touch /usr/local/sbin/post-boot
$ touch /usr/local/sbin/post-firewall
$ chmod +x /usr/local/sbin/*
VI編輯 /usr/local/sbin/post-boot
[编辑命令:i 输入字符 x 删除字符 esc 退出编辑 :wq 保存退出 :q! 不保存退出]
$ vi /usr/local/sbin/post-boot
內容是:
#!/bin/sh
# wait for /opt to mount
mount /dev/scsi/host0/bus0/target0/lun0/part1 /opt
i=0
while [ $i -le 30 ]
do
if [ -d /opt/etc ]
then
break
fi
sleep 1
i=`expr $i + 1`
done

# Activate swap
swapon /dev/scsi/host0/bus0/target0/lun0/part2

# Run all active services - active means starts with S
/opt/etc/init.d/rc.unslung
將檔案寫入 flash 記憶體
flashfs save
flashfs commit
flashfs enable
重新启动
reboot
接下來設定 SAMBA,首先建立路徑 /opt/etc/samba
$ mkdir /opt/etc/samba
$ mkdir /opt/ftp_pub
VI編輯 SAMBA 設定檔
$ vi /opt/etc/samba/smb.conf
內容:
[global]
workgroup = Workgroup
guest account = admin
security = share
browseable = yes
guest ok = yes
guest only = no
log level = 1
max log size = 100
encrypt passwords = no
dns proxy = no

[Wl 500gP]
path=/
writeable = yes
browseable = yes
guest ok = Yes

[USB Disk]
path=/opt/ftp_pub
writeable = yes
browseable = yes
guest ok = Yes
接下來建立批次啟動檔,首先建立路徑 /opt/etc/init.d
$ mkdir /opt/etc/init.d
VI編輯SAMBA啟動檔
内容是:
#!/bin/sh
/usr/sbin/smbd -D -l /opt/var/log/smbd.log -s /opt/etc/samba/smb.conf
/usr/sbin/nmbd -D -n WL500gP -o -l /tmp -s /opt/etc/samba/smb.conf
接下來改變S97samba檔案屬性為可執行檔
$ chmod +x /opt/etc/init.d/S97samba
VI編輯批次啟動檔 /opt/etc/init.d/rc.unslung
$ vi /opt/etc/init.d/rc.unslung
內容:
#!/bin/sh

# Start all init scripts in /opt/etc/init.d
# executing them in numerical order.
#
for i in /opt/etc/init.d/S??* ;do

     # Ignore dangling symlinks (if any).
     [ ! -f "$i" ] && continue

     case "$i" in
        *.sh)
            # Source shell script for speed.
            (
                trap - INT QUIT TSTP
                set start
                . $i
            )
            ;;
        *)
            # No sh extension, so fork subprocess.
            $i start
            ;;
    esac
done
別忘了改變檔案屬性為可執行檔
$ chmod +x /opt/etc/init.d/rc.unslung
最後重新啟動,確認設定是否正確
$ reboot
可能很多改机的朋友能用得上 所以写了 这个补充说明,希望对大家有用
在次感谢 贵站管理。在这里我学到了不少知识
最後修改: infall (2008-03-05 03:44:37)
離線
#7 2008-03-06 17:43:07
Re: [Oleg/LLY] WL-500g 系列改機基本步驟
我在Processes 看到
Memory 29.38 MiB 25.25 MiB 4.13 MiB
Swap 511.99 MiB 0 Byte 511.99 MiB
但我的硬碟為80G
這樣合理嗎?
我在telne裡打free看到
total used free shared buffers
Mem: 30084 25348 4736 0 3008
Swap: 524276 0 524276
Total: 554360 25348 529012
在fdisk -l裡看到
Disk /dev/scsi/host0/bus0/target0/lun0/disc: 82.3 GB, 82348277760 bytes
240 heads, 63 sectors/track, 10637 cylinders
Units = cylinders of 15120 * 512 = 7741440 bytes
Device Boot Start End Blocks Id System
/dev/scsi/host0/bus0/target0/lun0/part1 1 9043 68365048+ 83 Linux
/dev/scsi/host0/bus0/target0/lun0/part2 9044 10637 12050640 82 Linux swap
離線
#8 2008-03-06 21:20:11
Re: [Oleg/LLY] WL-500g 系列改機基本步驟
jameswoo 提到:
我在Processes 看到
Memory 29.38 MiB 25.25 MiB 4.13 MiB
Swap 511.99 MiB 0 Byte 511.99 MiB
但我的硬碟為80G
這樣合理嗎?
我在telne裡打free看到
total used free shared buffers
Mem: 30084 25348 4736 0 3008
Swap: 524276 0 524276
Total: 554360 25348 529012
在fdisk -l裡看到
Disk /dev/scsi/host0/bus0/target0/lun0/disc: 82.3 GB, 82348277760 bytes
240 heads, 63 sectors/track, 10637 cylinders
Units = cylinders of 15120 * 512 = 7741440 bytes
Device Boot Start End Blocks Id System
/dev/scsi/host0/bus0/target0/lun0/part1 1 9043 68365048+ 83 Linux
/dev/scsi/host0/bus0/target0/lun0/part2 9044 10637 12050640 82 Linux swap
看起來是沒什麼問題。
技術問題請於論壇上集眾人之力公開討論,感恩

離線
#9 2008-03-16 11:06:56
Re: [Oleg/LLY] WL-500g 系列改機基本步驟
[admin@WL500G root]$ fdisk -l
Disk /dev/scsi/host0/bus0/target0/lun0/disc: 1281 MB, 1281181696 bytes
40 heads, 62 sectors/track, 1008 cylinders
Units = cylinders of 2480 * 512 = 1269760 bytes
Device Boot Start End Blocks Id
System
/dev/scsi/host0/bus0/target0/lun0/part1 1 900 1115969
83 Linux
/dev/scsi/host0/bus0/target0/lun0/part2 901 1008 133920
83 Linux
[admin@WL500G root]$
首先感谢二位的教程,由一无所知到成功改机。谢谢。
问一下,我的part2怎么不是 linux swap system呢?
離線
#10 2008-03-16 14:39:32
Re: [Oleg/LLY] WL-500g 系列改機基本步驟
sailor 提到:
[admin@WL500G root]$ fdisk -l
Disk /dev/scsi/host0/bus0/target0/lun0/disc: 1281 MB, 1281181696 bytes
40 heads, 62 sectors/track, 1008 cylinders
Units = cylinders of 2480 * 512 = 1269760 bytes
Device Boot Start End Blocks Id
System
/dev/scsi/host0/bus0/target0/lun0/part1 1 900 1115969
83 Linux
/dev/scsi/host0/bus0/target0/lun0/part2 901 1008 133920
83 Linux
[admin@WL500G root]$首先感谢二位的教程,由一无所知到成功改机。谢谢。
问一下,我的part2怎么不是 linux swap system呢?
在 fdisk 裡分割完part2後,選 "t" 功能,將part2的system id變更為82。
最後別忘了,按"w"寫入變更。
技術問題請於論壇上集眾人之力公開討論,感恩

離線
相關討論主題
| 主題 | 回覆 | 點閱 | 最後發表 |
|---|---|---|---|
|
N16 刷 OLEG 1.9.2.7-rtn-4149 求助 作者 sb5101e
|
1 | 11984 | 2012-05-02 18:53:41 作者 sb5101e |
|
置頂 |
24 | 141592 | 2012-02-25 14:39:57 作者 wen1977 |
|
那位大侠帮忙把 Vuze 移植到 Oleg ? 作者 zhao.am
|
0 | 8653 | 2011-10-14 13:50:03 作者 zhao.am |
|
請問有人用 Oleg 灌osCommerce 2.2 ms2 作者 winsom
|
1 | 12718 | 2011-06-08 08:43:48 作者 Aven |
|
ASUS WL-500G DD-WRT应用很慢,SWAP不起作用 作者 dengi
|
7 | 37212 | 2010-11-04 21:41:55 作者 Aven |


